Saturday, 16 April 2016

Upgrading to Designer Edition


I am so excited as I have just created my first doily using my Silhoutte Cameo.  For £20 I upgraded to the Designer Edition and now I have more tools at my disposal.  I have just been looking into all the benefits of having upgraded so I am using this post as an exercise to illustrate what I can now do. I would like to thank the Silhoutte School for the tuition.

The Designer Edition offers a wide range of sketch pen options that are not available with the standard software.  Plus there are ways to fill in a sketch design to make it look like pencil, charcoal, scribble and so on.

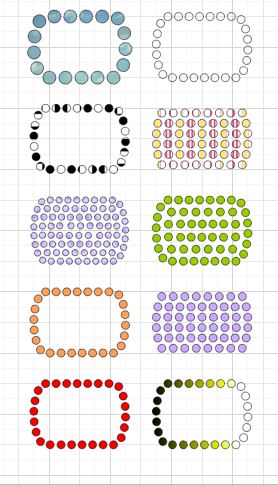


Another benefit to upgrading to the Designer Edition has to be the Rhinestone feature. With a click of a button you can turn any design into a rhinestone design.  


There is a tool for putting a shadow behind your text.

The eraser tool options enable you to pick the shape and size of the eraser and use it create designs and patters.  My favourite element is manipulating the eraser so the design stays open or becomes a closed shape which give you more design options.


The knife tool has lots of options now.


The Shear tool looks fun as it lets you move designs to different angles.


Making the doily was possible by using the ruler and grid as I was able to use the crosshair feature and snap the guides to the centre of the circle.


The time I will save by using the nesting option and it will also save card when cutting as it makes best use of the space available.


The transfer properties tool will allow me to fill another shape with a colour or pattern already use.


I will be able fill a shape with a picture or pattern.

And finally, I have the ability to use SVG files.

What's not to like about upgrading to the Designer Edition.

Saturday, 9 April 2016

Tri Fold Card

I have been making some cards using a design from the Silhoutte Design Store for a tri fold card, designed by Lori Whitlock. They have been a great way to use my toppers from Kanban's Blooming Marvellous paperkit. This style of card would have been tricky to make by the convention way.

Here is my collection. Each card has a sleeve to hold it tightly closed then when you remove it, there is a surprise waiting in the centre of the card.


This is my first attempt at writing some text, welding it together and cutting it out.


I haven't decided how I wish to use most of these cards so I am leaving the sentiments off until I am ready to use them.  Alternatively, I could place a flower on the front.


And here it is once opened.  


Here I have cut vellum for the first time.


And here it is opened up.


Again, I haven't finished the sleeve so it can be a get well card if I wish a Birthday card.


I have some lovely butterflies and found one that worked well with this colour scheme.


I just love these anemone's. I think I will edge this topper with some of my Stickles and see if I have another butterfly I can add to the card.


Well that's all until the next time, happy crafting. 


Saturday, 2 April 2016

Spring Daffodils

Well the clocks have gone forward so it is officially Spring time and to mark this happy event I have created some paper daffodils to hang from my lovely white tree.  I have a die to make these in miniature form but since I wanted them a lot bigger I found a design I could download from the Silhoutte Design Store for $0.74. The beauty of having my lovely Cameo Silhoutte is that after the initial outlay, it is very cheap to make what you want with it and to whatever size you require. Since purchasing a few weeks ago I haven't had to buy any new dies and I have even had a go at creating my own fancy cards shapes.  


Hope you like my large daffodils.  

As I said before, I have the ability to create these daffodils at any size and here are some more I have created which are a medium size.
I


Crafty hugs from Crafty Tashx

Friday, 25 March 2016

Wicker Easter Bunny!

Easter is finally here and it is lovely to enjoy some crafting time amongst other things planned for the Easter break.  

I have been playing with my Perfect Partner dies today but I am not quite ready to reveal what I have been up to just yet!


I would like to share with you today my decorated wicker bunny that I purchased from Hobbycraft.  I decorated it with some flowers I made using the Serenity paper kit from Craftwork Cards and then used my glue gun to secure them. I particularly love the tones of light blue. 


Have a great Easter, crafty hugs from CraftyTashX.

Friday, 18 March 2016

Some bunny loves you

Easter is almost here and of course I am excited as it means not only will I have some time with family but also more time to craft.  I am looking forward to putting my Easter display out which I will show you in my Easter post.  However, this weekend will be spent making Birthday cards for family members.

In today's blog I thought I would share with you some of the Easter cards I have made using my Cameo Silhouette this week.  I am getting on really well with it as you will see.

This first one has an embossed background called Woodland Glade from Tattered Lace.  I love the little images of an owl, fox pigeon and hare.  The Easter Egg is a die from Tattered Lace.   The Happy Easter, grass and Easter Eggs were made from a design from the Silhouette Design Store.  It did a great job cutting out the grass.


This next is made for the lovely man in my life, my husband. I have used another Tattered Lace embossing folder called Love Bird Berries which is appropriately named!  I downloaded this image from the design store and resized it in my Silhouette Studio to fit a 7x5 card.  

I decided to work with three copies of the image so I could cut them out separately in blue, green and brown.  The first was cut in blue.  Then before I cut the next in green I used the rubber tool to erase parts of the image that I didn't need to cut so it left the upper frame with the leaves on.  The purpose of this was to save wasting card.  Then I repeated this so I could cut out the bunnies.  Once they were all cut out it was just a case of layering them up and assembling the card.  The sentiment chosen was perfect.

Here is a sneeky peek at the inside of the card.


 and finally, a card shaped as an Easter Egg.  Again, another image downloaded from the Silhouette Design Store for about 50p!


Enjoy your weekend crafters everywhere.

CraftyTashx

Monday, 7 March 2016

What can I make with my Silhoutte Cameo

Well they say the possibilities are endless and I am inclined to believe this.  The cameo has a 12x12 cutting area which is perfect for creating scrapbook pages and it does a lot more besides.  

I toiled for weeks over whether to purchase a Brother Scan and Cut, a Cricut or this machine and opted for this little beauty because it offers the crafter the most flexibility in the way they want to craft.

Now that I have my Cameo I can cut elements for my cardmaking to whatever size I require unlike the conventional way with dies. 

I can cut around my own stash of images or those available in the Design Store with the option of cutting around the edge or adding a slight border.  I can even turn my craft stamps into images for printing.

Vinyl decor is becoming a popular way to decorate your home and with this machine it is easy to cut and length is not an issue.   

Changing the blade to a sketch pen adds the drawing element.  My cameo will also cut fabric and heat transfer material meaning I could design my own tee-shirts and do etched glass.

This machine will revolutionize the way crafters craft in the near future.

Since my Cameo arrived on Saturday I have been getting acquainted with it.  It wasn't as hard as I expected to use and already I have created a couple of tags, cut out an element for a card and made a card.  All easy to do through online tutorials available on YouTube and Craftsy website.

Here is what I have made in the first 24hrs of using it.


First I cut a tag which was available as a free image with the Design Studio software.  All I had to do was re-size appropriately before cutting out.  

I wanted to use my Foundation Card which I purchased from Joanna Sheen's website.  It is the same card used by Creative Expressions and is 200gsm. All I needed to do was place the cardstock onto the 12x12 cutting mat and load this into the machine. I used a blade setting of 4, one up from that recommended, due to the weight of the card.

I left it on the mat after the initial cut because I then wanted to sketch the hearts onto it and would reload the mat when I was ready. This would ensure the hearts were drawn where I expected them.

The next stage was to add the sketched image (again free with software) to my tag and then switch my blade out and replacing with the sketch pen before sending it through the machine again.

What I have learned from this experience is that you can identify different areas of an image to cut, or not cut so it means you build the complete card then select what you want to do with it at the end.  i.e. select the area you want to cut or sketch.


This time I created a tag from scratch by drawing a rectangle and a circle and welding them together to create one uniform shape.  I then added the word "love" to the edge of the tag and welded that together.   Finally, I wanted another go at the Sketch Pen so I added a word "you" in the middle.


Here is one of the free images I chose to cut out.


And here is my first purchase.  This Easter Egg image was 65p.  Much cheaper than purchasing a die and as I said before, I can make this to any size within the parameters of my 12x12 cutting mat.


and finally this was the last project of the day.  Here I cut direct onto an 8x8 card which was quite heavy so I set the cut speed down and checked the box for a double cut.  

Sunday, 21 February 2016

Kanban Shabby & Chic

I simply adore this paper craft kit from Kanban.  It is a kit that works well with any haberdashery dies and ribbons and pearls.

I have been working on it for the last week or so so haven't worked my way through all the kit as yet but would like to share with you some of the cards that  have made so far so that I can offer you some inspiration.


I have used some parchment paper and put this in an embossing folder to create interest to the background.  


Similarly I have created the same card but made this one into a Mother's Day card and used some pearls to adorn the mannekin.


I have made this card using a pre cut central stepper card that has a nice shape at the bottom and my haberdashery dies.


On this card I have cut into the rose edge so that the topper slides underneath the edge.  It just needs a sentiment to finish it off.


I have added some decoupage roses across the front of the card.


This just needs another sentiment to finish it off.  Do you see how I have used my pearls to make a bracelet and necklace on the topper.


I have used some more parchment paper on this card.  Firstly to make a background to mount the Happy Mother's Day on and secondly to make a butterfly.


Some decoration using my pearls.


Good use of my parchment butterflies.  I knew they would come in handy.


Another parchment butterfly to adorn this card.

Watch this space as more cards will follow.... and a week later, I am sharing with you my entire collection of cards made using this papercrafting kit.


It's funny, now that I can look at them as photos I have a few more ideas for adding some additional embellishments here and there!